
My first telescope was a Celestron Omni XLT 102 with a CG-4 mount. This was exciting to look through and check out Jupiter, Saturn, the moon, and some star clusters. I did some planetary imaging through it, and even attempted some astrophotography through it! After a while I bought a SkyGuider Pro camera tracking mount to take tracked images of the night sky. This was fun, but it wasn't quite what I was looking for. Eventually I purchased an actual go-to computerized mount, an iOptron GEM28. I used this with the Omni XLT 102 until I purchased a William Optics Zenithstar 61II. Now I could finally take legitimate images of deep sky objects! This was a short focal length telescope, and I wanted to reach further into space. To do this, I purchased a GSO 6" f/4 Newtonian telescope. I had a lot of trouble collimating this and dealing with coma. In frustration, I then purchased an Astro-Tech 115EDT. This triplet is amazing and I thoroughly enjoy using it. Along the way I also picked up a used Meade 8" SCT. I've done some planetary imaging through this telescope, but it's mostly been used for observational astronomy. I never gave up on the GSO Newtonian. It took a while, but I finally purchased a coma corrector that actually worked. This larger telescope has potentially parting ways with the AT115EDT, time will tell. I recently acquired a second go-to mount, an iOptron GEM45. I've used it twice now, and my first night was spectacular. The second night has had some hiccups, but nothing related to equipment.
I've met some other astronomy geeks along the way so far in this journey. We've traveled around to local dark sites to make the best use of our equipment. On occasion we were greeted by unpredicted cloud cover. Who doesn't love that?! I've traveled to Cherry Springs State park twice now. It's about a four hour drive to get there, which makes it tough to schedule sometimes. My favorite place locally is my father's house. It's not as light polluted there as it is where I live. The difference between Bortle 6 and Bortle 4 is significant! I live in a big town (some might call it a small city), and my view of the sky is obstructed by houses and street lights. This makes getting any imaging done at home quite a challenge due to limited targets available.
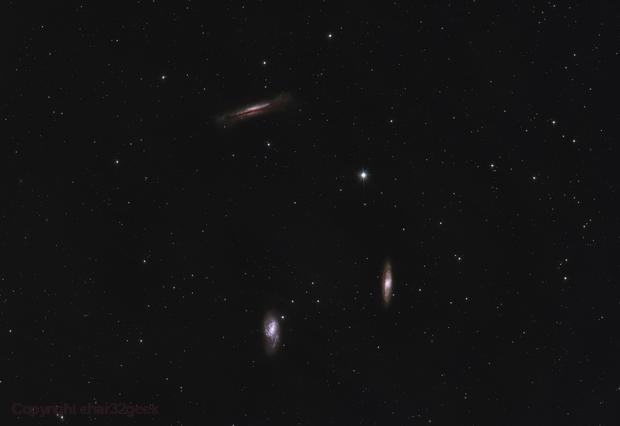
Last night I made my second attempt on the Iris Nebula. My first attempt was a little over a year ago and it was an epic failure. It's not looking great so far for this attempt either! I had a speck of dust on my filter (not uncommon) that moved (less common) when I brought my telescope inside this morning. This makes calibrating it out of the final image almost impossible. Additionally, the Iris Nebula is mostly recognized by the surrounding dust. I only captured about three hours of data, and it might not be enough to bring out the dust. If this is the case, I will have to hold on to this data and go after the Iris again when the skies clear up!
It's about 3am here and I'm watching a video about space. There's a very interesting part at the 16:15 time stamp. Because the things we observe outside our galaxy are so far away, the expanding space between us causes them to seem to be moving away at significant speed. This causes relativistic time dilation, meaning the very distant events we observe appear to be happening slower than they actually are! How cool is that?! We're watching supernovae in other galaxies in slow motion. Thanks universe!
I was talking with Kelby earlier yesterday about the comment often thrown about that the images we take of deep space are not real. I had a small chuckle knowning that none of the work I have been putting out there could be accused of being AI generated. I am truly an amateur and it shows!
My AT115EDT has been shipped off to it's new home. I'm going to miss that amazing triplet. Hopefully it'll get some great use in Arizona! It's still very cloudy here, so in the meantime you can enjoy this new revision of my Andromeda Galaxy image over on AstroBin. Also of note, my Dad and Step-Mom made an offer on a new house. While telling me about it, he brought up how it might be a better place for me to set up my rig. It's nice to see my Dad is still interested in my hobbies in our old age!
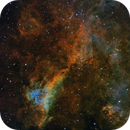
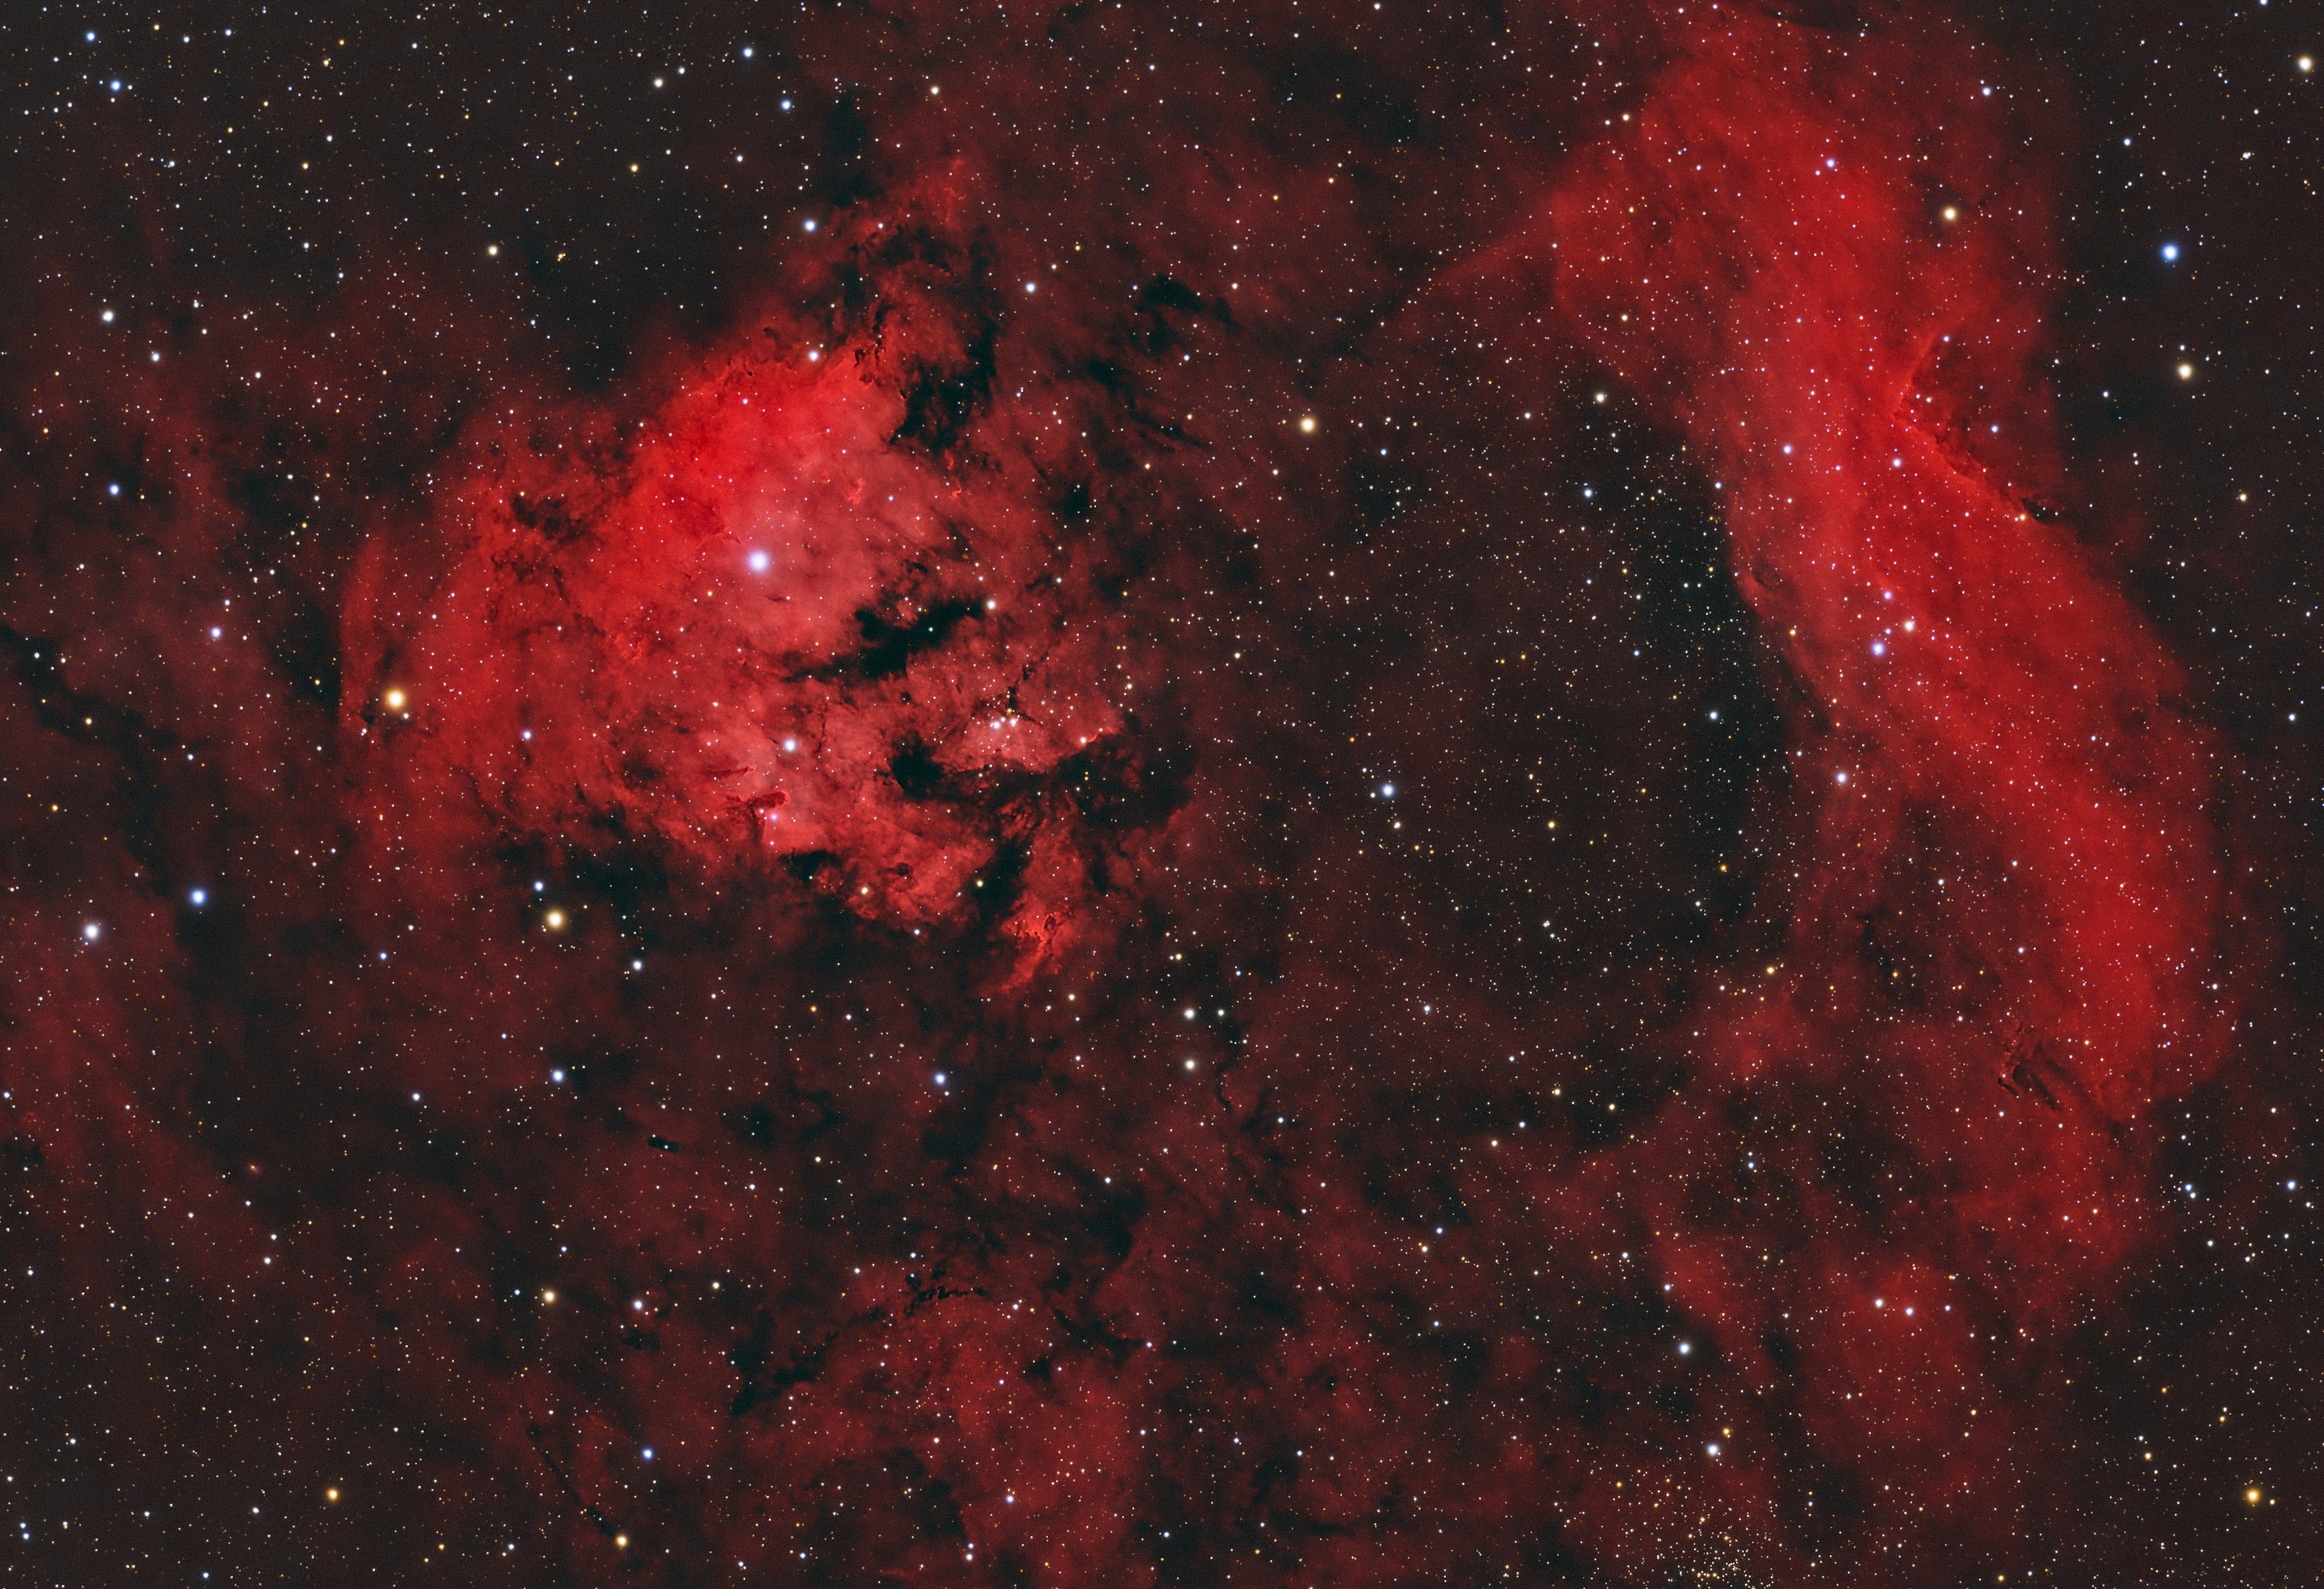
Two nights ago I returned to my arch-nemesis, the Iris Nebula, and captured almost six hours of data on it. The conditions were average and there was an issue with my primary
mirror not being entirely tight. Whoops! I noticed during the sequence that stars in a bottom corner were a little off. After the meridian flip, the stars were still off
on the bottom. I didn't detect any flexure in the image train, which is why I blame the primary mirror. I combined that data with the data from about a month ago to see how
improved it would be. Well, it was definitely better, not near as much of an improvement as I'd hoped. Out of curiousity, I stacked the data from only the second night to
gauge how it was. I achieved a better result without adding the first night's data. It really was bad data. Here's the previous attempt:
It looks terrible. I only posted it to show the progression of the first attempt for those who remembered how terrible that was. I uploaded the combined data to instagram, clear here if you'd like to see that. The final revision I uploaded to my AstroBin profile, check it out!
I am finally going to get into narrowband imaging! I bought a bundled mono camera that comes with a 7x36mm electronic filter wheel, and a bigger off-axis guider. It is Player One Astronomy's Artemis-M Pro (IMX492) camera, their Phoenix Wheel, and FHD-OAG Max. This is what I settled on after considering an IMX571 mono camera. That one has a bigger field of view, but also larger pixels. I wanted to continue with the smaller pixels, despite the challenge, in order to capture the finest details, in theory. I don't yet know how soon it will arrive, and I still have to get the filter set I'm eyeballing.
My camera arrived yesterday. The quality of it and the OAG surpass my ZWO products. The filter wheel is equally impressive, but I've nothing to compare it to. I am going to shoot luminance data (UV/IR filter only) through the camera to test that out. Knowing myself, I will probably also try the UHC filter through it out of curiosity! Hopefully things go well and I'll get the filters next month.
This previous Sunday had clear skies and I was planning on going to a dark site to do some imaging on the Heart Nebula. However, some unruly forest fire smoke rolled in making the trip not really worth it. I stayed home and set up my GEM28 with the William Optics Z61 to test out some new methods I had read about. Basically, I shortened my exposure length in order to attempt to mitigate the background light pollution in my image, as well as not saturate (or blow out) the stars in the image. I took some images with just the UV/IR filter on in order to get colored stars to extract and put in the final image. I swapped filters to the UHC filter to try and cut through the smoke and light pollution and get some Ha signal for the overall image. I wasn't expecting to acquire any Oiii data at all, and I didn't. The smoke really started to get think around 3am and I ended my session short. My mount also became unresponsive right after the meridian flip. My GEM28 has done this before, normally when I was done imaging and told it to park. I would have to go to the hand controller and issue the command that way for it to work. I will keep an eye on that for sure. Here's the image I was able to capture. It's not great, but it's recognizable. The short exposures worked great in dealing with the stars. The background noise wasn't as bad either, all things considered.
There was an unexpected clear night on Saturday that I was unaware of. Kelby pinged me and told me about it as I was getting ready to go to bed. I went out and checked for myself, and the forecasts were indeed wrong. I was under clear skies! I rushed like a madman to setup the same rig I had out previously. No I didn't. I don't rush to do much of anything at this age. The considtions were slighly above average and I captured almost 6 hours of additonal data on NGC 6823. Here's the updated image. I had the same unresponsive issue after meridian flip as before, with an additional PHD2 error. It had started guiding and then stopped after I had corrected the unresponsive mount. Luckily I was paying attention and only lost one three minute exposure. I'm not certain what's causing this issue on the GEM28. The next time I use it, I will not automatically do a meridian flip. It won't be much more involved as I always go out to monitor the flip anyway. I don't fully trust everything to work properly.
My narrowband filters were originally scheduled for delivery today, but it's looking more likely that it will be tomorrow judging by the USPS tracking status. I had planned on using the Z61 first, but now after some thought, I think I'm going to go with the Newtonian and aim for the Tulip Nebula in Cygnus. I may be able to capture to the bow shock from the black hole there!
The sky was actually clear the night my filters arrived. I carefully assembled the image train following these instructions. The camera in the video isn't the same one as mine, but the method of connecting is the same. According to the Player One website, you will achieve 55mm of back focus when the camera, filter wheel, and off axis guider are connected. I have concluded that your mileage may vary! This did not work on my William Optics Z61 with the FLAT61 field flattener. The star aberrations indicated the sensor was too close to the focal plane. I backed off the image train as far as I could and still it was not far enough. I had to place another 21mm spacer on the front of the OAG, and here is where I had a little help.
William Optics' guidance for back focus for use with the flattener is what I had been using, and it did not work. This meant everything was trial and error from here on out. I spent the entire night fooling around with this trying get it right with no success. The next night was clear and I had some advice on how to figure out what distance I needed to move back. It sounded good on paper, but it also didn't work. I unscrewed the entire image train up to the flattener all in one assembly and brought it inside. I then installed the additional 21mm spacer between it and the OAG. I had no idea how far I needed to screw this configuration onto the flattener to get the proper spacing. This was my last idea and I was frustrated, and I shared this in a little prayer asking the Lord for help. I attached the image train and was prepared for more trial and error with the new spacing. First I had to refocus the telescope. Polaris shows up in my field of view from the zero position, and once that was roughly focused, I slewed to a Altair to fine focus. After that it was time to take a 10 second exposure to examine the star field. It was perfect! In a hobby where .5mm of space will throw off your star shapes, the odds of getting that new spacing on the first shot are astronomical! For me, this is an answered prayer, divine assistance from our loving Creator. The actual distance I needed was 19mm further than the suggested spacing.
Now that the spacing was sorted, it was time to get imaging! The conditions were not good. This is why I had decided to go with the Z61 over the Newtonian, as widefield is more suited for poor conditions. I chose the North American Nebula (NGC 7000) as my first narrowband target. I caputed one hour of Ha data, then one and a half hour or Oiii data, and finally one hour of Sii data. I went in this order because I would be collecting Oiii right before the meridian while the moon was further away. There were some high thin clouds that strolled over while getting the Oiii and Sii data. This caused a significant halo around a star that I managed to treat a little bit in post processing. It was a little different taking dark flats instead of bias frames, and having to do that as well as flats for each filter. I quickly processed the data and put up an image on instagram and shared with some others. The next day I looked at it, and reprocessed the data to get a result I'm much happier with. You can see both here on AstroBin.
I went out last night with the moon illuminated at 99% to test these Antlia narrowband filters. I wasn't really sure what to expect, but was still a little confused that the data I was getting wasn't as good as the North American Nebula data. I was imaging the Veil nebula and as most know, the Ha and Oiii emissions are strong enough to capture with color cameras. When I looked at the weather, I realized why; Canada was sending forest fire smoke at us again. To make matters worse, I forgot to tighten the camera angle rotator on my telescope and the weight of the filter wheel caused the camera to rotate when I slewed to begin imaging. I had been taking 10 minute exposures again, and 7 of the 9 I captured were at a 45 degree angle from what I had intended. I took a few stabs at the data anyway, and didn't like any of the results. I figured I would go out again tonight, as it was again clear, and just add more data. Wrong! The smoke is looking even worse. Check it out. This has become a project that is a work in progress. I did throw together an HOO image to post on Instagram. It's a mere three hours of data (1.5 each of Ha and Oiii) and the conditions really impacted it. See for yourself.
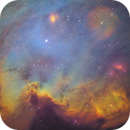
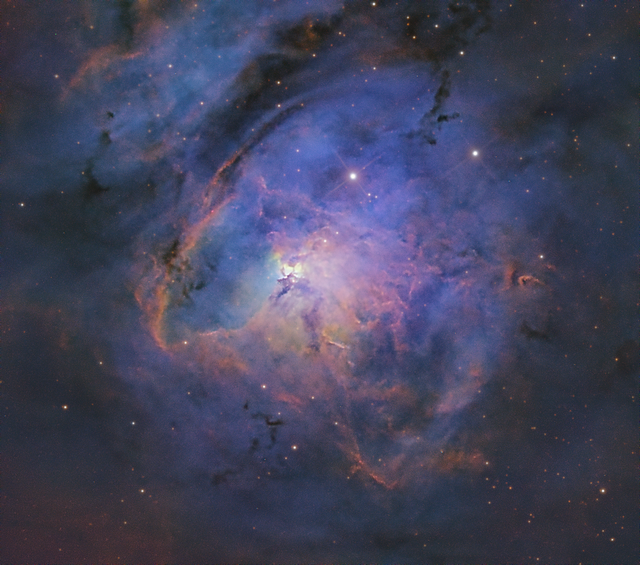
Tuesday was a clear night and my first opportunity to test the skies at my Dad's house. I took my GSO 6" f/4 Newtonian as well as the William Optics Z61. The idea was to try the new camera with the Newtonian and if I couldn't get it working reasonably fast, I would switch to the Z61. As luck would have it, I pulled off the best collimation ever on my reflector! The 75mm back focus spacing did not work, and it worked perfect at 55mm. There's something strange going on with the Flat61 from William Optics and it's spacing. As I got on target and the first image came in, I noticed there were deformed stars in the bottom corners, but were fine everywhere else. I am chalking this up to tilt from the focuser, which I'm going to have to figure out how to deal with. The sky at my Dad's new house is a little darker than where he and my Step-mom previously lived. I'm really happy they bought a nice house, in a dark neighborhood! The object I went after was the Elephant Trunk Nebula, also known as IC 1396. Also of note, Kelby decided to make the switch to mono imaging as well. That night was his first light and he went for the Wizard Nebula. His EdgeHD 8" SCT framed it up nicely.
Procrastination has caused this delayed update. I have solved the spacing issue with the Z61. That first night I set up with the same extra 20mm of spacing and nothing was working. When I removed it, going back to the spacing settings the flattener required, all was well. The only thing that makes sense as to how this happened, would be that I had unscrewed the camera angle rotator from the focuser while removing the flattener the first time to install the new camera. The thumb screw on the rotator still held everything in place, but the flattener itself (along with everything behind it) was now further back from the focal plane. I have to be more aware of what is moving when I'm adjusting that scope, that's for sure!
On the 18th and 19th the skies were clear, albeit with some wildfire smoke. The seeing was avagerage to slightly below average for both nights. I opted for revisiting an area near Sadr that I had captured before with my Z61 and 183MC Pro. I could now get a wider field of view with my mono camera, and figured it would be much more interesting. I was not prepared for how difficult this would be to process. The Ha and Sii regions overlapped quite a lot and each had it's own fine structures. I collected more Oiii data than I did the Ha and Sii, but it still wasn't quite enough to get some Oiii regions to pop. I'm not sure if it's my processing or the data itself, time will tell!
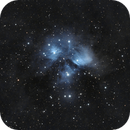
It's been a while. I had made an attempt at WR 134 in the middle of September, and never got around to adding more data to the project. I posted the "here's what I have so far" version on Instagram, and you can see that thumbnail below. Later on I finally ordered Antlia LRGB filters. It was quite a wait for a clear night where I was off work to test them. I settled on trying the Messier 45 (Pleiades) star cluster. Despite being in a frost warning, and frost everywhere, my night was ruined by fog. I had LRB but no G data. It also isn't ideal to do LRGB in my Bortle 6 yard, but what can you do? That happened on November 11, and a week later I would have another clear night. This time I opted to return to narrowband imaging and targed NGC 1599 (California Nebula). You can see the full resolution of that result here, or just check it out on my Instagram profile (link below). You may also noticed I did some reprocessing of two previous sessions. Hopefully the skies will clear up a bit in December as the new moon approaches.
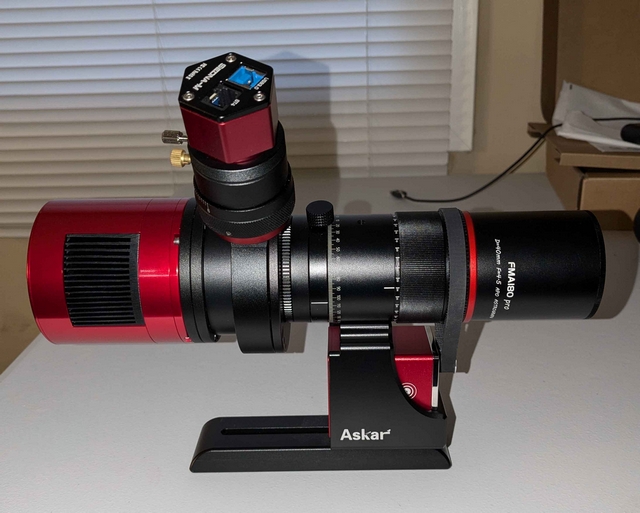
You may notice two recent pictures added to my Instagram profile. Friday night was a clear night with average seeing, and I had some new equipment to test out. Yes, I bought more stuff! I snagged this Askar FMA180 Pro for even wider fields of view than my William Optics Zenithstar 61 provided. In addition to that, I purchased another filter to use with my ZWO ASI 183MC Pro, the Antlia Triband RGB Ultra. This filter has a similar bandpass that dualband emission nebula filters have, but it's not as narrow. It also has a bandpass around 435 nm, which is visually blue. This allows for imaging of galaxies and blue reflection nebula, which aren't well captured by Ha and Oiii dualband filters. I had an excellent idea for a first light test for this filter.
The Pleiades star cluster is a beautiful blue reflection nebula with wispy faint dust surrounding it. It would be visible most of the night for me. Trailing right behind it in the night sky is the Orion nebula. I figured I could split the nine hours of darkness between the two and shoot Pleiades for six, and Orion for three. That part of the plan worked out. I did notice that throughout the night as it got colder, my focus became softer. This is where having an autofocuser would come in handy, as I could run a focus routine every hour or so. I opted to be lazy and just left everything go as is, even though it would've taken only a few minutes to refocus. I will also add that I did this from my iOptron GEM28 mount, using my iOptron SkyGuider Pro's small counterweight for balance. This small lens and short focal length would've been OK to just rely on the mount's tracking, but I did run autoguiding regardless. This allowed me to dither the images and avoid walking noise. Now, on to the results...
The Pleaides turned out about as I expected. I was curious if I would capture the fainter dust around the stars in six hours through the local light pollution. It appears I did not. A close inspection of the stars shows the focus problem. The background was relatively easy to deal with. There look to be a couple more clear nights coming up and I think I'll either add more time on this target or try the same camera and filter on my 6" Newtonian and see what happens. If that's the case, I'll most likely be aiming at the Triangulum galaxy. The roughly three hours I aimed at Orion turned out a little better than expected. This is a very bright object so I had no doubts that I would at least get the main nebulae clear even through the light pollution dome. I also picked up surrounding Ha in the image. In my hasty processing, about 60% of that background signal ended up shaded brown (as dust) instead of red (as hydrogen alpha gas).
I fully host my domain on Neocities now (again), no more silly redirect.
Also, I went out last night and added more data on the Pleiades cluster. It looks more presentable now so I added it to my AstroBin page. I also corrected the background in the Orion image and
uploaded the better version to Instagram. If you didn't see the old one, the previous update where I complain about it is meaningless now! Here's the link for the new Pleiades image:
Here is my end of the year update. I have been on the road a lot related to my job, and when I've been home it's nearly always cloudy. Things are in the works at work so I don't have to be traveling so much, so that's a plus. I have also decided to sell a bit of my gear, entry level stuff that I started out with. I want to get the Poseidon-C Pro from Player One Astronomy, with the filter drawer and OAG as a kit. The field of view on this is close to the Artemis-M camera I have. I was saving for that or the Askar 103 APO (with both the 1x flattener and .6x reducer/flattener). That scope with those two accessories would provide roughly the same coverage of my Z61 and GSO 6" Newtonian. I was flip flopping between which to buy, when I decided to check out the Cloudy Nights classified section. There was an amazing deal there I could not pass up, a carbon fiber TPO 8" Ritchey-Chretien! It has some accessories and upgrades. Most notably, a Moonlite focuser and Pegasus motor focus kit. The price for all of this was just a little more than the telescope would cost brand new. How could I pass this up?! Next weekend I will be going to pick it up, if things don't change. It will be nice to have something to image distant galaxies. It is roughly twice the focal length of the AT115EDT telescope I had, that I continue to regret selling.
This will leave me with three imaging systems. The Askar FMA180 Pro, the GSO 6" Newtonian, and the TPO RC8. At the moment my ASI183MC Pro hasn't sold, so I could still operate two systems at once. I still intend on getting that Poseidon-C Pro kit. The Askar 103 APO would still be in consideration, depending on how well my Newtonian holds up. I am debating on making some modifications/upgrades to that. That's all for now, see you next year!
I have sold my William Optics z61, ZWO ASI183 MC Pro, along with the off-axis guider and filter drawer I used with it, and of course the ZWO ASI120MM Mini. These were entry level things I started out with, and figured why not pass the savings along to someone else in the hobby. That being said, I need some updated images of my equipment on the front page...
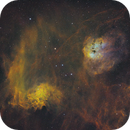
Speaking of equipment, I was able to get some imaging done Saturday night with the TPO RC8 I've had parked inside for over a month! Friday night was forecast as possibly clear, therefor I had initially planned on getting luminance data on Messier 81, then doing RGB data Saturday night. Friday was cloudy, very cloudy, 95% cloud cover cloudy. For the life of me, I don't know how they mess up forecasts so bad! That left me with Saturday night to get something done with the big boy, and I chose a narrowband target since I was only going to have one night. (More on that later.) I opted for the Monkey Head Nebula, cataloged as NGC 2175, or NGC 2174, depending on who you ask. Either way, you can check it out by clicking the thumbnail below!
That target wasn't in the sky all night, so when it set behind my neighbor's trees, I switched over to NGC 4565, the amazing edge-on Needle Galaxy. I didn't expect this short session to yield much, but rather to get started on a longer project throughout galaxy season of capturing this beautiful galaxy. Much to my surprise, it looks pretty good. Since it's a work in progress, I only posted it to my Instagram profile, check it out.
There's something else in the works currently. Monday, and Tuesday night all are forecast to be clear. I set up my Askar FMA180 Sunday night and started shooting a wide field area in Ha. After 5hr 40min of data, the result is stunning. Tonight I am capturing Oiii data. This signal is normally rather weak, but so far I am barely seeing any in my 10 minute exposures. If tomorrow holds and is clear, I will collect Sii data. I also have a few minutes of RGB scheduled at the end of tonight to get RGB stars to replace the stars of the SHO image. I use this small setup from on top of a roof. This allows me to sleep while it's running so I'm not the walking dead at work the next day. I don't really trust taking my heavier equipment to the roof, so it's sort of only available on weekends, holidays, and vacation days.
I finished the project I was working on, and was a bit exhausted from the lack of solid nights of sleep over the four day span. It was worth it though, considering how long I've waited for clear skies! This is my longest integration by about 5 hours. The RGB stars I captured after the Oiii data were out of focus. I shot them again on the next night before starting the Sii capture. They turned out much better, but one star seemed to have been deformed somehow. I figured this had to be a multiple star system, and sure enough it is actually a quadruple star system. This is why it appears egg shaped, because my small lens could not easily resolve the separate stars themselves, and all the light appears together in one object. The system in question is 14 Aurigae, at the top left part of the image. As always, you can check out the image by clicking on the thumbnail below!
In other news, I have purchased a new desktop computer. It is a significant upgrade from the old monster I have. This will speed up image processing quite a bit. It'll also have a nice side effect of improving the quality of the games I play. I originally wanted to buy this system from MAINGEAR. Their website is a little janky, and I got a fraud alert (declined payment) when I tried to make the purchase. That took me over to CyberPowerPC where I bought this customized system, only changing the chassis and upgrading to the AMD Ryzen� 7 5700X 3.4GHz [4.6GHz Turbo] 8C/16T 32MB L3 Cache processor. It ended up being a whopping $30 cheaper than the other system I went for. I currently have a 3.5GHz i7 processor with 4C/8T and was wanting to go up to 20+ threads, but alas, I'm on a budget.
I have had my new PC up and running and it's such a relief to be able to process astrophotography data faster. This past Saturday was clear and I had hoped to get the RC8 out and do some planetary imaging, and then fool around with some lucky imaging on planetary nebula. However, I tweaked my back a little earlier in the week and I decided against lugging a bunch of expensive, heavy equipment outside. Instead, I set up the GSO 6" f/4 Newtonian on the roof. I had to mount the 60mm guide scope back on it, as I had my ASI224MC loaded in the focuser. There is no off-axis guiding with that. I did manage to get some data on Jupiter with the 2.5x barlow. It's not the greatest, but it's by far much better than what I had achieved with my 4" Omni XLT in my early days! After that, I did some lucky imaging on the Eskimo Nebula, which turned out better than expected. I tried the owl nebula, but it turned out worse than expected, so I threw in the towel. The rest of the night I spent goofing around taking quick snaps of bright stars. I had also set up my Canon T7i and Askar FMA180 Pro to take some star trail images. This sort of worked out, but sort of didn't. I wanted to center on Polaris, but in the view finder I centered on a different star.... Whoops! I put those three images up on my Instagram profile, check them out!
Another clear night rolled in and I wanted to try the Newt again, but this time with the Artemis-M Pro imaging train I have. The scope is mounted with the focuser down still, and with the 6lb of camera gear on the focuser, it is extremely off balance on the declination axis. It would slew to targets, and get there eventually, sometimes after about 6 platesolving and centering attempts. Guiding was a bust, as it wouldn't properly calibrate. I had forgot about the ADM weight attachment that I had recently aquired with the RC8. I went with just the tracking on the GEM28 for the night. I tried a quick session on The Beehive Cluster (Instagram link). When I saw it was reasonable, I then went ahead with 6h 45m of LRGB data on the Leo Triplet, at 15s a pop. This resulted in 1,620 exposures to calibrate and stack. Thank God for the new PC! My old desktop would've laughed in my face and went into witness protection if I tried to do such a task. The walking noise from not guiding/dithering was pretty bad, but other than that the background wasn't terrible. The stars left something to be desired. I ran BlurXterminator on each of the stacked filter results before combining to help mitigate them. Even with short exposures, it seems some of the stars begain to trail and I ended up having some of the brighter stars slightly elongated. This gave a weird chromatic aberration effect when the RGB stacks were recombined. The galaxies themselves are the best result I've had on this target. The thumbnail below suffers from jpeg compression, be sure to click on the link to see the full resolution image!
The next day I tried affixing the weights to the back of the Newt to balance it, but the threaded bolt for the weights would hit the rear of the GEM28 mount. I probably could make adjustments to get it to work, but I had another big brain idea. The tripods on my GEM28 and GEM45 are the same, with the exception of the built in disc pads on the GEM28. This is the reason I don't use the GEM45 very much at home, because I can't set it up on my roof. Those pointy tripod legs might puncture the roofing material. When I set up in the side yard, the amount of sky visible is greatly limited by the surrounding buildings. This week I plan to swap the GEM28 and GEM45 mounts between their tripods. The GEM45 has a higher saddle clearance, and the weight on the back of the Newt would have no issues. Also, that weight would make the payload 19lbs, so I think putting it on the beefier mount is a better solution anyway. Factoring in all the mount weight, tripod weight, payload, and counterweights, the difference between the two sets is suprisingly minimal. It would be 37lbs total with the GEM28, and 45lbs total with the GEM45. It's not as much more on the roof as I had expected, and with the discs on the feet of the tripod, I feel it should be no problem. I guess we'll find out!
It has been a while, hasn't it? The unfavorable weather is mostly to blame for this. There were a couple of clear nights that also had a very bright moon in the sky, which makes imaging from light polluted skies an exercise in futility. I did configure the 6" Newt onto the GEM45 with the swapped tripod, as planned. I had to reposition the tube rings and add the weights to the back for DEC balance, or as close as I could achieve. It looked good on paper, but guiding was absolutely terrible. I also discovered a significant light leak around the focuser. My frustration with this telescope reached it's limit at this point. I sold the coma corrector and collimating laser, and the scope itself is in the county landfill. This means I now want to get another telescope in the 500-700mm focal length range, as well as the IMX571 color camera on my wish list. There's also another mini-PC on that list, so I can get greedy an run two rigs at once.
Thursday and Friday night were forecast to be clear all night. I set up the RC8 on the roof, a first for me, and prepared to image the Needle Galaxy while also testing the autofocus setup. It was quite a learning curve, but I managed to get some useable RGB data that night before some high clouds rolled in around 2am. Friday night's forecast looked to be about the same. There was more tweaking of the focus kit and collection of luminance data. The motor focus control settings are just about dialed in perfect, except for the backlash settings. All in all, it was just under six hours of total data that went into the final image. Check it out on AstroBin by clicking the thumbnail below!

The internet was buzzing almost as much as the sky was last night. We had a major geomagnetic storm and I was able to see the Aurora Borealis. I did have to travel west and a bit south to see the Northern Lights on account of the clouds. The roughly two hour trip was worth it. I was wondering when the light show would begin, as the northern sky was still a bit bright on the horizon as it was getting dark. I happened to look south and see the sky had a pink hue, so I aimed my Canon T7i south and took a five second exposure. Yes, there it is! When I looked behind me to the north, I could now see the streaks of light in the sky. The entire sky was aglow with green and pink activity within minutes! I was turning the camera around so many times to try and capture some really cool shots. I also snagged a few short timelapses. My favorite image though, is the one below. The timelapse clips are two that turned out ok. The last one was capturing the fog bank roll over the reservoir, but it was cut short by someone else pulling in with headlights aimed right at me. There's another image on my Instagram profile that isn't terrible.

If you've been following along, I had been planning on getting the Askar 103APO telescope to replace my 6" Newtonian. This has now been replaced on the list by the Astro-Tech AT80EDT. You might remember that I had the AT115EDT, and sold it to continue fooling around with that pesky Newtonian. I kick myself for that, I really do. This little triplet would still be a wide field telescope, but far less wider than the Askar FMA180 that I have and love. That would leave me with a gap between 480mm focal length and 1600mm focal length, which would be around 1000mm if I were to split it. There is a .67x reducer that works with my RC8 telescope, bringing it's focal length down to about 1070mm, and about f/5.4 for the focal ratio. That would allow me to use the same telescope for two different ranges of targets. The IMX571 color camera is still next on the list though, along with a filter drawer and OAG to operate it properly.
I've been preparing things for the trip to Cherry Springs for the star party. It's possible I will be able to fit both tripods in my little car amongst all the other things I must take along for the camping trip. I haven't used two setups simultaneously yet. I tried a while back with the SkyGuider Pro and my GEM28, but that night was a bust. This would be much different, as both would be remotely managed and controlled via NINA.
The weather was not good for the Cherry Springs star party, so I did not go. The following weekend looked promising but only yielded one clear night. I collected some data on the Pelican Nebula area that I had been yearning to capture for years, and it turned out better than expected all things considered. Click the thumbnail below to see more!

I will occasionally reprocess old data when there's not much else to do. If I like the revision, it'll be uploaded to my AstroBin profile, if it's not quite up to that standard, it might only make it to my Instagram profile. When I was finished on the Pelican Nebula last weekend, I aimed at the Lagoon Nebula to see how that might look if I get a chance to collect proper data on it. I took a single five minute exposure with each narrowband filter to create the test image below. The core of the Lagoon looks like a very promising target!
I know I said an IMX571 camera was next on the list, but I changed my mind. I went with an IMX533 camera, the ZWO ASI533MC Pro, to be exact. The pixel size is the same, the technology is basically the same, only the sensor size (and price) are really significantly different. In fact, this camera was on sale for $100 off, making it less than half the price of the IMX571 cameras. I warmed up to the idea of a square sensor over time and gave this more consideration. When I woke up and saw the sale going on, I just pulled the trigger. My buddy Kelby was selling his ZWO OAG-L, so I bought that from him at 75% the cost of a new one. All that was left was a couple of adapters to get it connected to the camera. I can't quite use two setups at the same time in my current configuration, due to only having one guide camera. If I really had to, I could use a guide scope on the FMA180 Pro and use my planetary camera (ASI224MC) as a guide gamera, but I don't see the need for that. For now, I'll just swap the Player One Sedna-M back and forth as needed. Oh, I also bought a ZWO EAF and an Askar bracket to connect it to my FMA180 Pro. This helped tremendously in focusing, achieving smaller stars than I did with the Bahtinov mask that I had been using. Here's how it looks all set up (w/o wires).
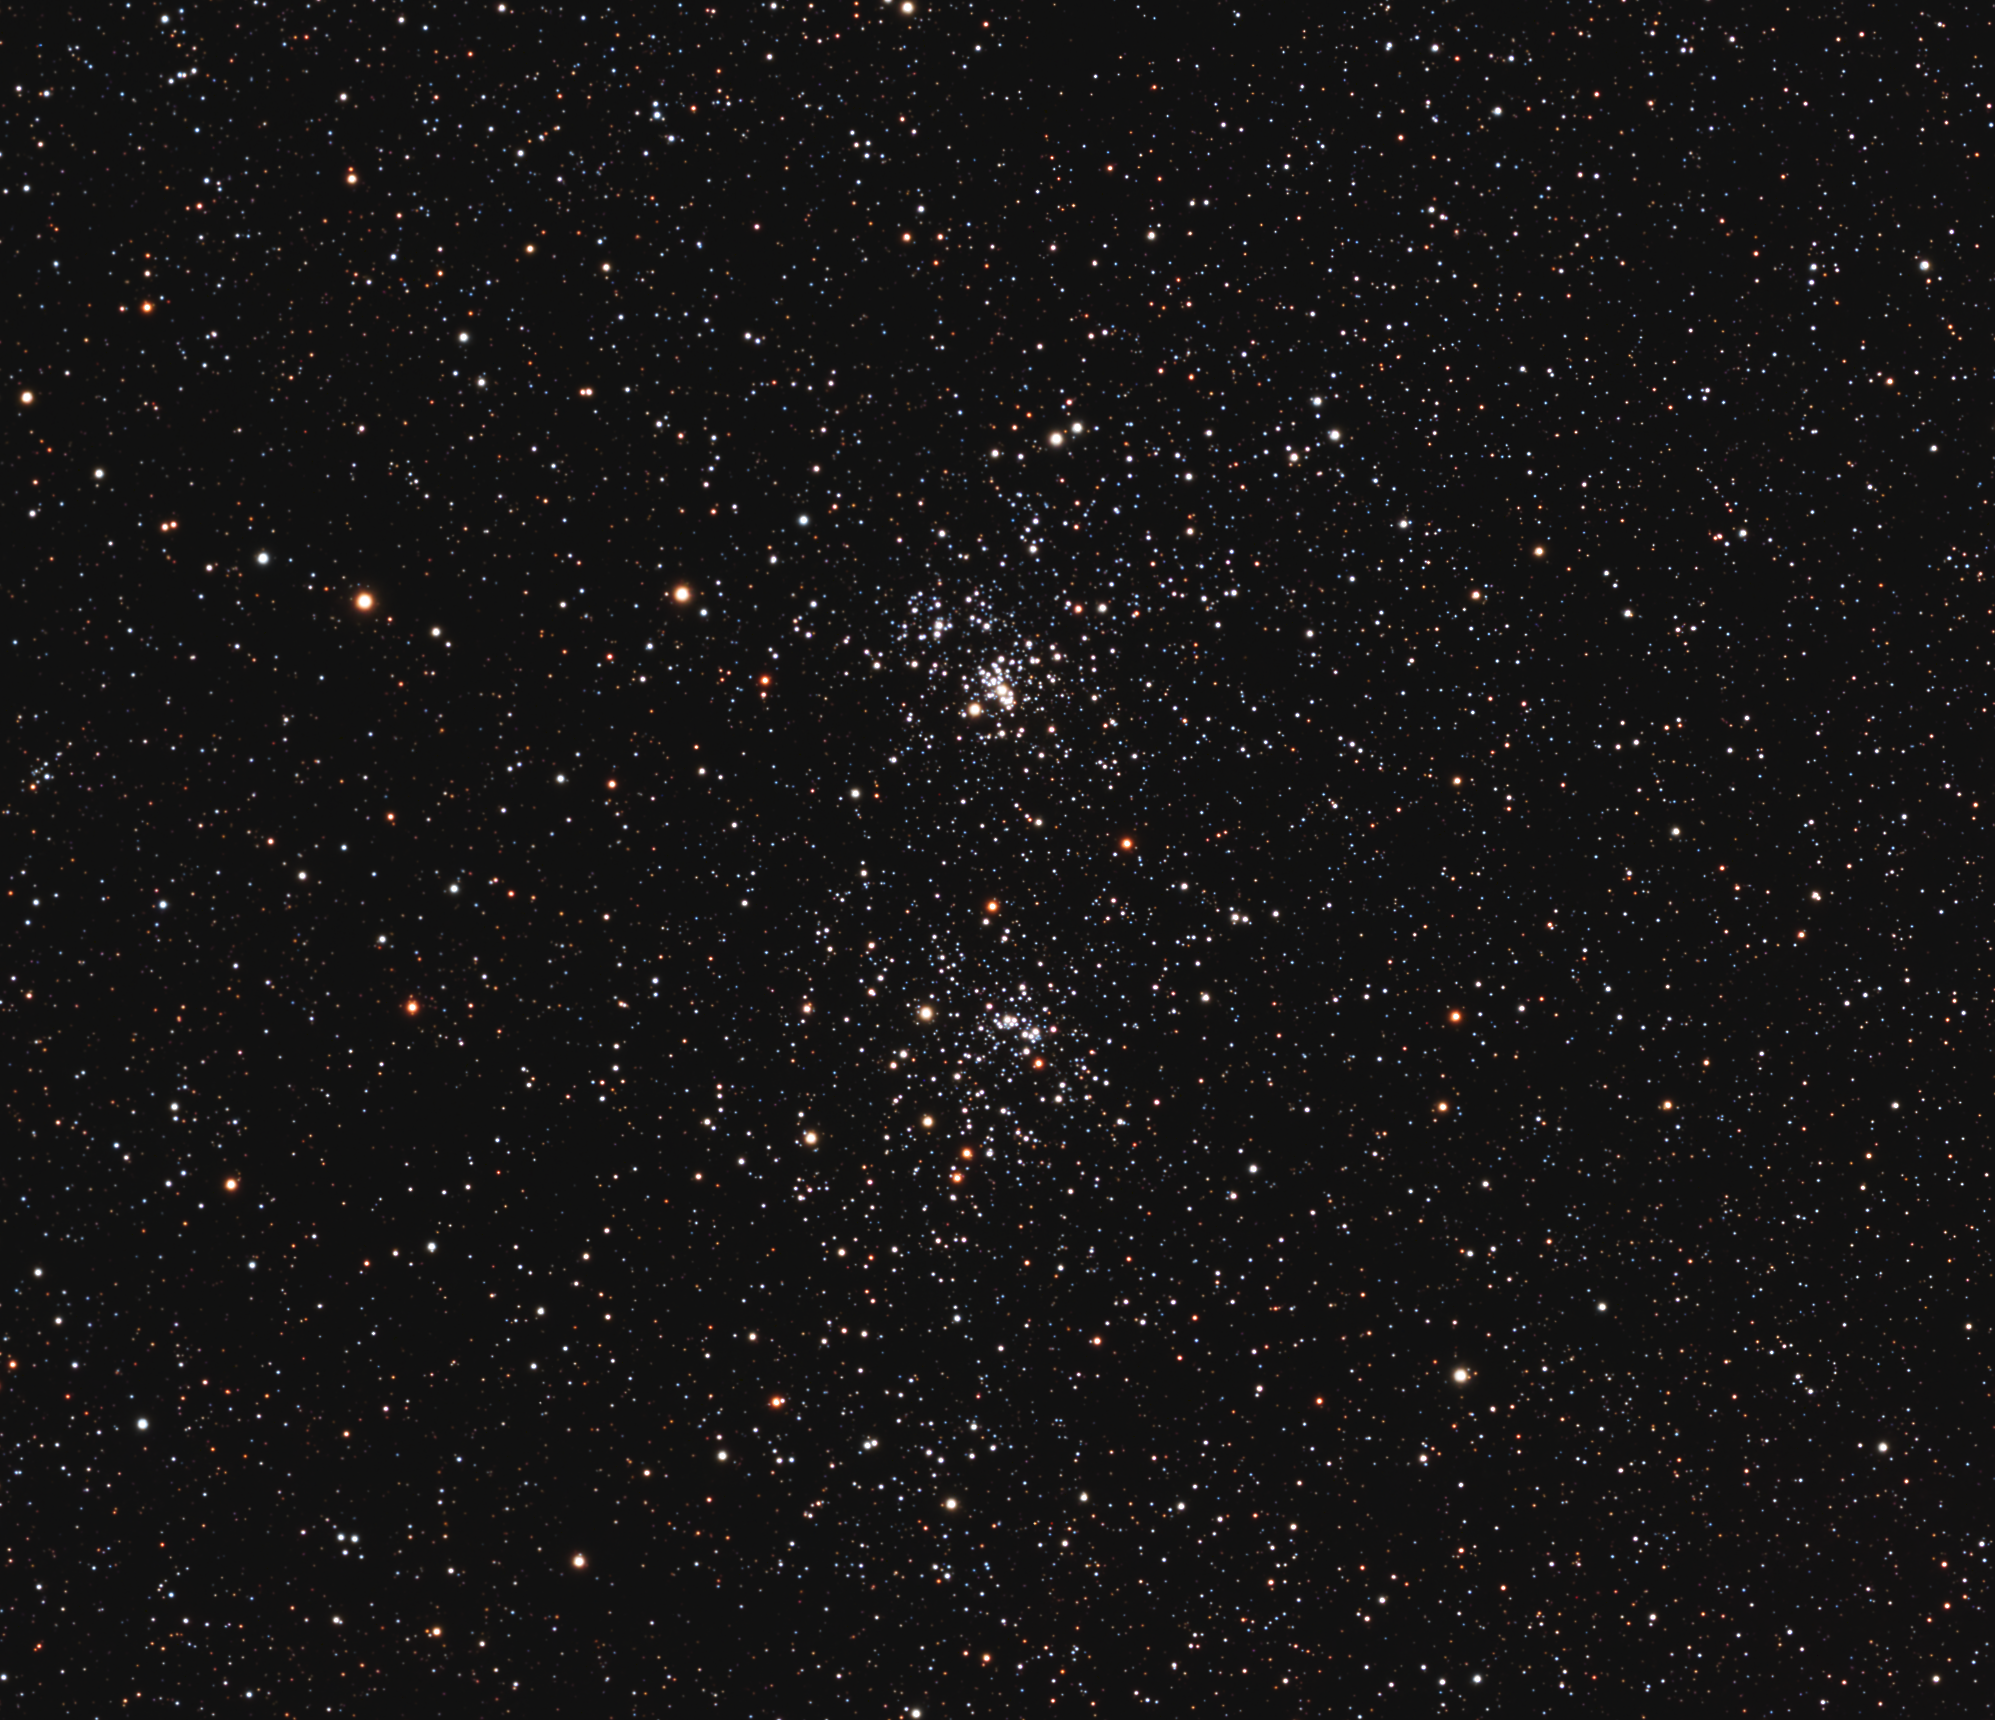
As luck would have it, the weekend after receiving these new items was clear. I made use of Friday and Saturday night, but Sunday night was hampered by forest fire smoke. It was actually the one year anniversary of testing out my Player One Artemis-M Pro, so I decided to shoot the same target, the North American Nebula. This time my field of view was wide enough to include the Pelican Nebula in the shot. At the end of the night, I collected 15 minutes of data on the Perseus Double Cluster. The next night I went for the Cygnus Loop, which proved a bit more challenging. Click on the thumbnails below to check them out!


I did it again. There is a new telescope in my arsenal. I'd been eying up the Astro-Tech AT80EDT. It was on sale for $100 off for a long time, and I didn't pull the trigger. I found a used one with the .8x reducer/flattener for sale in the Cloudy Nights classifieds section for $650! That was too good to pass up. Even now, as of writing the new scope is on sale for $200 off (about $650) but doesn't include a flattener. It also comes with a soft case. The one I bought has a hard case. The weekend after it arrived had a couple of clear nights. I switched over the ZWO EAF from the FMA180 Pro to the AT80EDT, with some rookie blunders, and set up to capture data with my Artemis-M Pro on a target that's been on my wish list for a while. That would be NGC 7822. The Sii and Oiii signals were a bit noisy and it was quite a challenge to come up with something I liked. In frustration, I produced this tamed down HOO version:
Over on my Instagram and AstroBin profiles, I released a first SHO revision that was close to what I wanted. I've since come up with a better edit of that data, and you can click this thumbnail below to check it out!

This Labor Day weekend ends with a new moon, and a few days of clear skies. However, I might only be able to take advantage of the first night, go figure. I have some tweaking to the autofocus settings for the AT80EDT that I need to sort out before going out again with that setup. I have yet to try out the ASI533MC Pro with the RC8 yet though, and might go with that and aim at a small target to see what happens.
This is a bit of a late update, completely reflective of my slacking interest in this hobby. September 13th looked promising for some clear skies, but I was exhausted from work and skipped out on an attempt. The next day I did set up, and it was frustrating. I switched the image trains on the AT80EDT from the Artemis-M Pro to the ASI533MC Pro, and properly adjusted the ZWO EAF's backlash. Everything was working properly, until I set up the rig outside. The EAF would connect, but not actually move the focuser when directed. It wasn't even beeping to indicate it was trying! I noticed I was way off focus from the previous setup, and this was because I had managed to flip the .8x reducer/flattener around backwards. The EAF began to work again, but now clouds had rolled in. Once the sky cleared up, I began imaging the Inchworm Cluster (NGC 6910) beside Sadr. Later on, more clouds spontaneously appeared to my east, headed west, and ending my session after about three measly hours. There's a nice mixture of signal in that area of the sky, but the Oiii was washed out by light pollution as well as the brightness of the moon. I know I keep repeating it, but the amount of cloudy nights lately is mind boggling. Maybe I never noticed it before this hobby, who knows. I hope there's a clear spell for the new moon at the beginning of October. If it's favorable, I will travel to Cherry Springs and spend some quality time under dark skies. Until then, click the thumbnail below to check out the details on the latest attempt!

It seems as if I run into a problem every time I do something new. I took my RC8 out to my dad's Bortle 4 skies to test it out with the ASI533MC Pro. I don't have a filter drawer for that camera, and wasn't able to properly place a filter in the image train. To make matters worse, my mini PC is having Wi-Fi issues, constantly dropping connections. This happened over the mobile hotspot connection as well. I wasn't able to sit inside the comfort of the living room and monitor the session. I had to go sit outside from time to time, closer to the rig. Focusing was tough without a UV/IR filter. A constant light breeze was annoyingly bothering the guiding. All in all, I captured 138 three minute exposures, four of which were rejected in PixInsight's WBPP, giving me a total of 6hrs 42mins on target. Being out in darker skies, I began to miss visually observing through a scope. I have my eyepieces still, but no longer owned a diagonal. Someone on Cloudy Nights was selling one in the Classifieds section, so I pulled the trigger on it. I nearly bought a Celestron Luminos 7mm eyepiece, but it's not much more magnification than my 10mm Luminos, it can wait. Click the thumbnail below if you want to check out the AstroBin post of my image.

Another thing went wrong at the end of the session. When I was putting the RC8 away, I rotated the camera for easier storage without taking note of where it was. I didn't realize this error until I was home and ready to take the flat frames. My plan was to take a single .05s exposure and compare it to a single light frame and make adjustments and repeat until I got it as close as possible. I rotated the camera back to where I estimated it was last night and set off to see how close it was. I couldn't believe my eyes, it was dead on! Check out the video below to see. You will probably have to watch it at full screen to actually see the dust circles.
Last weekend I went out with my AT80EDT and Artemis-M Pro to get some imaging done. I ran into a problem right away, as has been the norm. Once again I somehow managed to have the reducer installed backwards. This time I figured it out quickly and solved that. I got in focus, calibrated the guiding, and slewed to target. There I did some rotations with the camera until I was framed how I wanted it to be. However, at about the time of the meridian flip (when the target transits from the east side of the sky to the west side of sky, requiring the telescope to also switch sides of the mount), my filter wheel hit a tripod leg. Guiding went crazy, because it wasn't moving in RA anymore. I ran out to see the problem. What I didn't notice until post processing, was that the action actually was enough to turn the camera angle rotator, causing my Oiii data to be a bit wacky. PixInsight does an autocrop at the end of the WBPP script, and I usually use these files. This time, I could not. Too much of the Oiii was cropped with that script. I did salvage enough of the field of view to get it almost exactly how I framed it with some creative cropping on my own. Check it out below!

I can't exactly remember when (and I'm too lazy to go look), but I bought an Astro-Physics CCD67 reducer. This will take my RC8's f/8 1600mm focal length down to about f/5.6 and 1100mm focal length. This will allow for some better integration on the not so tiny targets. I also bought a diagonal so I can do some visual observation through my RC8, maybe even through the AT80EDT, who knows. This also will allow for some planetary imaging through the RC8. It was clear at the time of posting this, and should be clear tomorrow. I have to remove the focus motor kit from the RC8 to get it ready, which will be a task for tomorrow. We'll see how it goes!
This weekend there were a couple of clear nights for me to enjoy. It seemed more an opportunity to image something than to test out the 8" scope with it's new reducer. I surfed the sky in Stellarium, debating which target I wanted to focus on for two nights. I had thought of the Soul Nebula, a logical follow up to the Heart Nebula. That's a very common target and it wasn't really what I felt like doing. There are many less common targets available, but are they reasonable to attempt from my light polluted back yard? I settled on a pair of reflection nebulae, vdB 15 and vdB 14. They were allegedly bright enough, however they appeared quite diffuse, meaning it would be tough for me. There also is some dust and fainter Ha signal in the area. The end result was better than expected, which was so much of a relief! Click the thumbnail below for a higher resolution image with the technical details about the acquisition.
